
In today’s article, I’m going to teach you how to identify and trade order blocks.
Order blocks are high probability supply and demand zones created when the banks split a single large trading position into many smaller positions. They provide low risk/high reward reversal entries and make a great side setup alongside a main strategy.
Sound interesting?
Without further ado, let’s crack on with the guide…
What Are Order Blocks: An In-Depth Analysis
Before we start… here’s a quick primer on what order blocks are and the mechanics of why they form in the market.
It’ll be quick, I promise.
So, order blocks… what are they?
Order blocks are price zones created when the banks enter a large trading position using a block order (more on these later). The zones represent points where price has a high probability of reversing.
Here’s how they look…
Seen these before?
Looks like a demand zone, right?
That’s because orders blocks ARE supply and demand zones— just a much rarer type.
Order blocks come in two varieties:
We have…
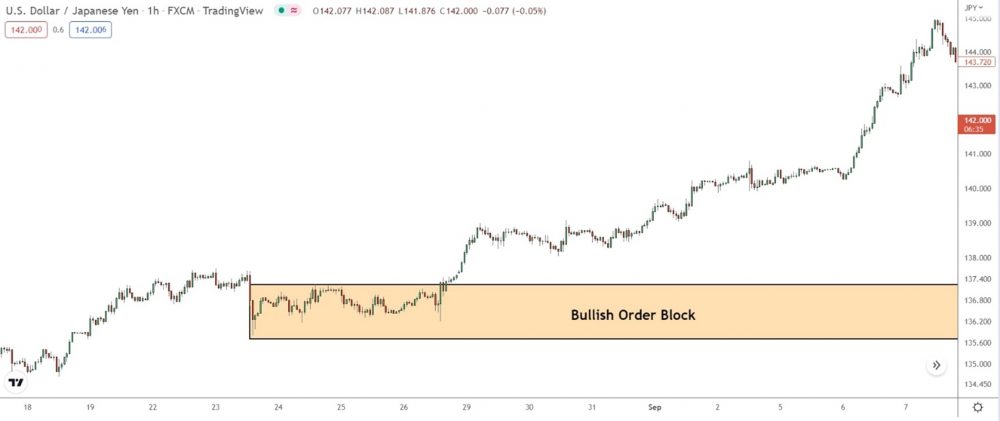
Bullish order blocks – these act as demand zones. And…
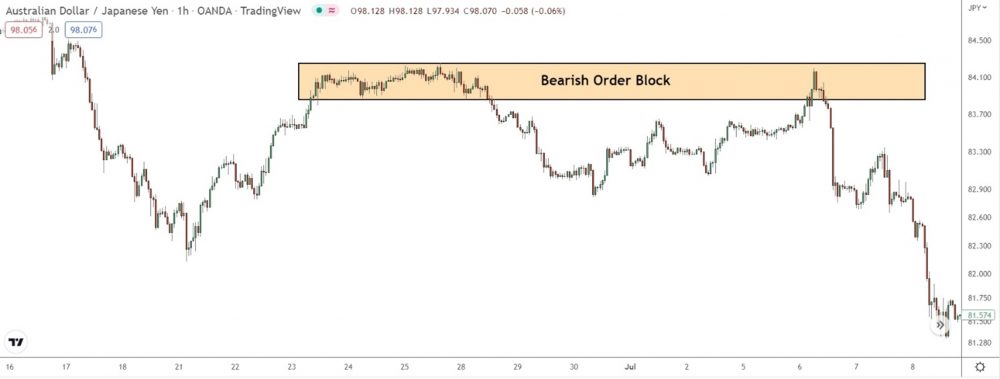
Bearish order blocks – these act as supply zones.
Order Blocks Vs Supply And Demand: What’s The Difference?
From the above, it’s easy to assume order blocks and supply and demand one and the same – a new twist on an old formula, if you will.
But you’d be wrong…
Order blocks and supply and demand zones appear similar, but the reason they form and what they represent in the market are NOT the same.
So what’s the reason then?
Well, let’s find out…
Order Blocks Form Due To Block Orders
Buying and selling in forex usually means using a limit order or market order. But another order type exists that only banks and hedge funds can use: block orders.
Block orders break a single large trading position into smaller, digestible pieces. Rather than execute a single huge order, causing major slippage, block orders enter multiple small positions at similar prices across a small price range.
What’s the main benefit?
In short: The block order replicates placing a single large trade without causing slippage albeit at similar prices.
Clever, huh?
But wait, why is this important for the banks?
The banks hold many advantages over us retail traders. However, one key weakness in their operation: Liquidity – or lack thereof.
The banks usually lack the required liquidity (buyers or sellers) to enter their positions without incurring slippage – i.e., without pushing price against themselves. That’s a big problem, as you’d expect. So how do the banks solve low liquidity?
That’s right – Block orders!
Because the block order splits the position into smaller chunks, the banks require less buyers or sellers to enter. They can low liquidity and avoiding slippage.
Make sense now?
Order Block Strategy: How To Find, Draw, And Trade Order Block Zones
Many order flow experts drone endlessly on how difficult order blocks are to find and hard it is to trade them… bla, bla, bla. In reality: finding, drawing, and trading order blocks proves no different supply and demand zones.
Here’s how it works…
- Find the order block.
- Mark the zone correctly (easy!)
- Wait for PA pattern and enter (simple!)
Sounds easy, right? Let’s jump in…
Finding And Drawing Order Blocks Is Easy… Sort Of
Order blocks share many similarities with supply and demand zones, but one way they differ: the shape and structure they create upon formation.
Shape and structure, what does that mean?
Let me explain…
Block orders split a single large trading position into smaller, bite sized pieces. These smaller positions then execute at similar prices. The idea being to replicate a single large order using many smaller orders instead.
What does that look like on a price chart?
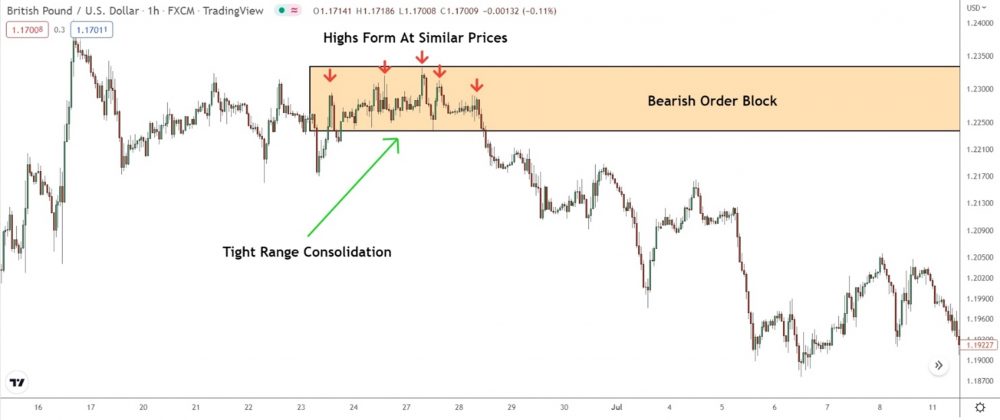
A narrow range consolidation with similar priced highs and lows.
See for yourself…
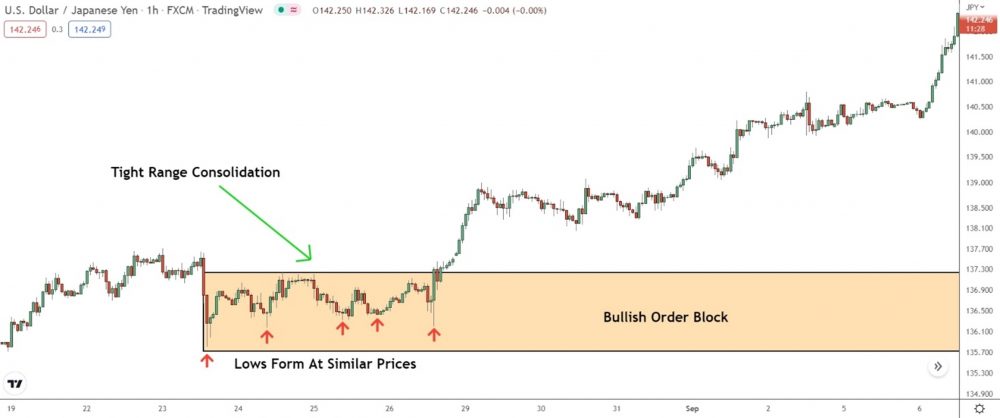
This bullish order block’s highs and lows all form at similar prices. That’s the block order! Each low represents a tiny position executed by the order.
Keep in mind: ALL order blocks follow the same structure above.
Look for a small consolidation with similar priced highs and lows. Some zones highs/lows won’t always line up, but the general appearance will remain the same; a tight, almost rectangle shaped consolidation.
SO: To identify order blocks…
- Look for a narrow range consolidation.
- Check the highs and lows form at similar prices.
- See if price has a strong move away from the zone.
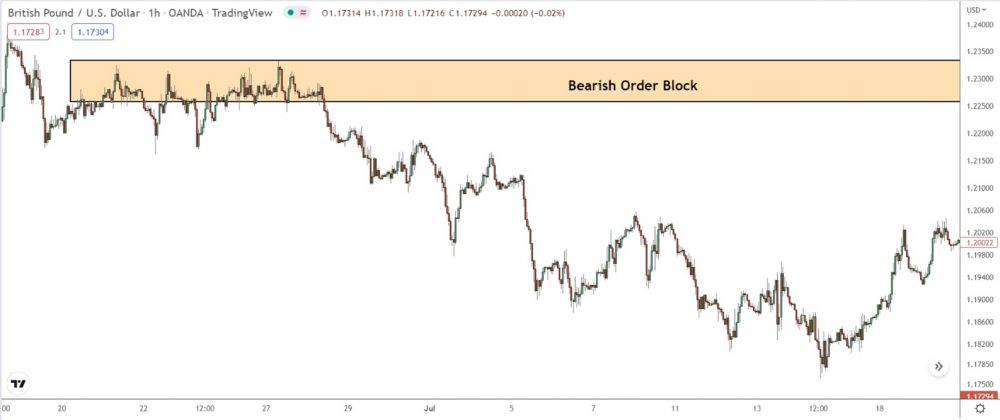
Here’s another one…
Same structure, different example.
The order block develops from a tight consolidation with evenly priced highs and lows.
Simple, when you know how.
From Beginner to Pro: The Simplest Way to Draw Order Blocks
Next up: Drawing order blocks.
Drawing order blocks requires covering two key points where the banks could enter any remaining positions when price returns.
What are those two points, you ask?
For bullish order blocks…
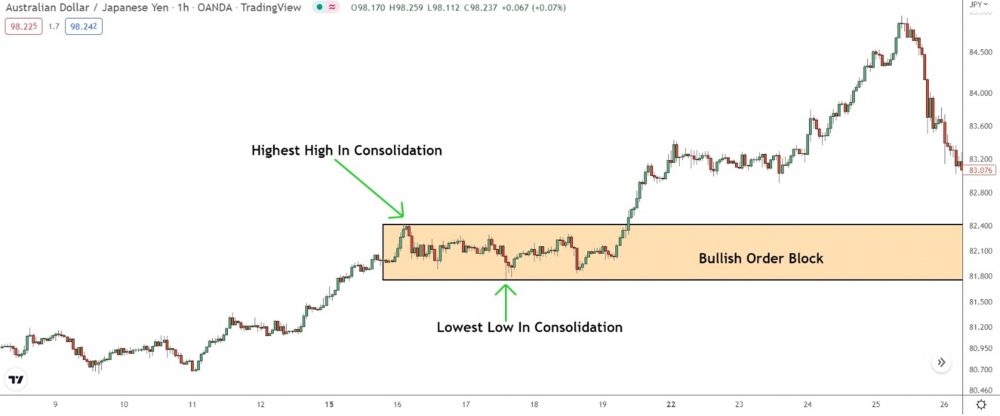
From lowest low to the highest high, cover the block. That’ll contain any points the bank decides to place more positions in the future.
For bearish order blocks…
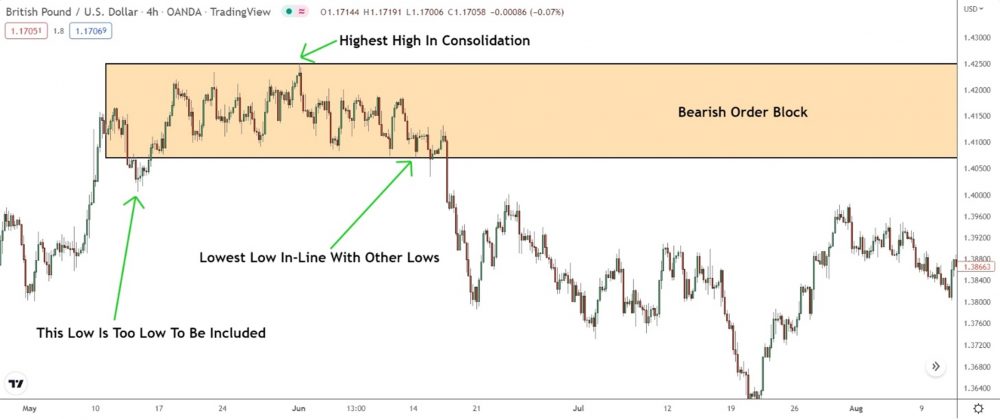
Again, cover the whole block, but this time: from the highest high down to the lowest low.
Order Block Entry Confirmation: 3 Simple Signals To Watch For
So, now you’ve learned how to (hopefully) identify order blocks and draw them according to the right rules.
Great, what next?
Time for step 3: Order block trading strategies.
While there are a few different ways to trade order blocks, only 3 allow you to trade the zones with minimal risk and maximum reward. What are they?
Read on…
#1: Pin Bar Entry
We all know the pin bar, right?
You know, the spiky candle with the long wick?
Pin bars make great entry signals for order blocks because of why they form: from the banks buying or selling behind the scenes.
They’re saying…
“Hey, we’re buying now. Hop in quick!”
The pin indicates the banks might be entering their left-over positions, which means price could be about to reverse from the zone.
Here’s a quick example…
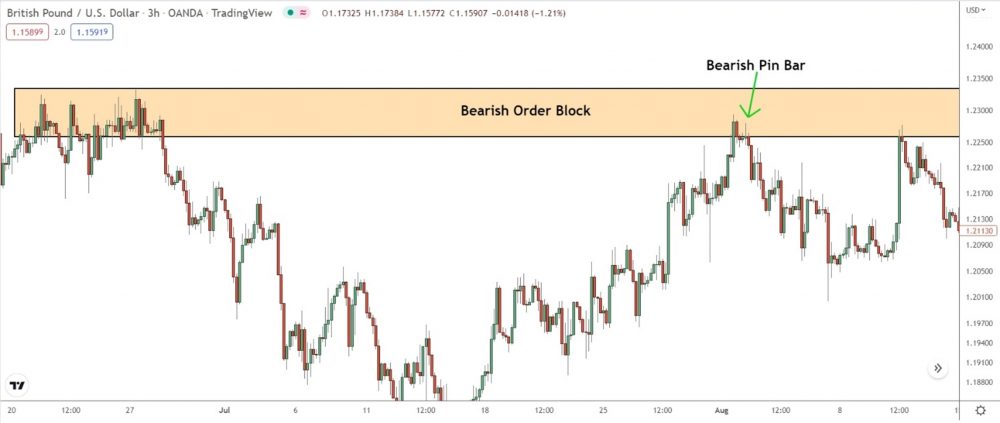
Look at the order block above… see the bullish pin bar?
That’s our entry signal – the pin shows the banks bought up the current sellers. Why would the banks be buying inside the order block? Oh, yeh…
To make price reverse, DUH!
Later that day…
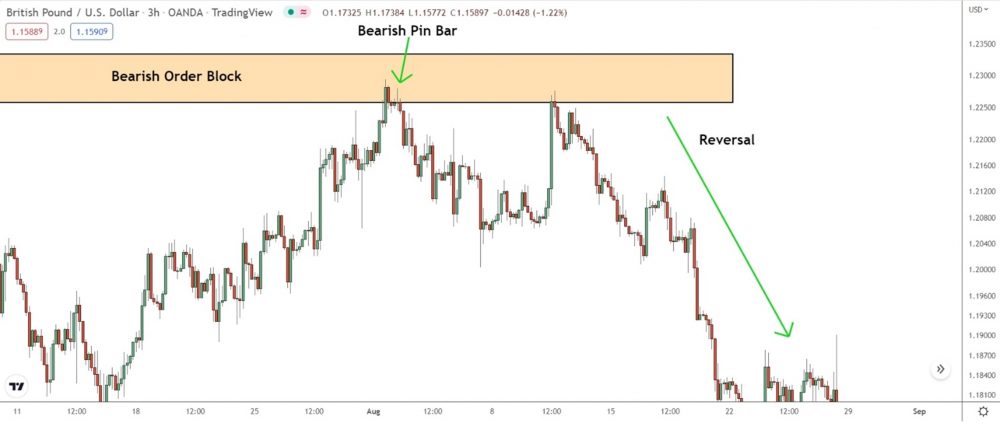
We see price reverse and a significant new down move begin.
Simple, huh?
#2: Engulfing Pattern Entry
You’re probably wondering:
Why use engulfing patterns when we have pin bars?
Because two’s better than one, right?
I’m kidding… the real reason?
Because: Engulfing Patterns appear more often than pin bars. Yeh, it’s that simple. Pin bars offer solid entries, but only form occasionally. Engulfing patterns mitigate this problem – the patterns initiate the move away, so usually form before price reverses.
What makes engulfs suitable signals?
Same reason as pins – the banks!
Engulfing patterns ONLY form when banks buy or sell in large amounts.
So, they indicate the banks want price to reverse from the order block.
Example…
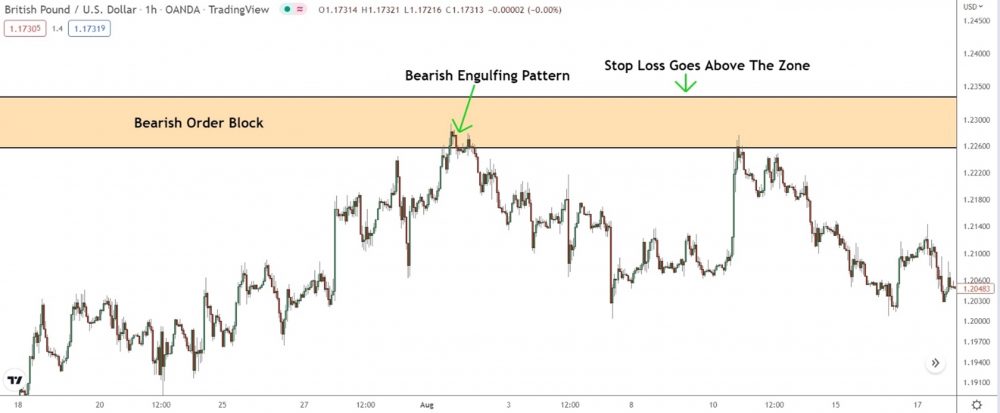
After entering the order block above, a large bearish engulfing pattern forms. Time for us to get in! The engulf confirms the banks sold a large amount of EUR/USD – a strong sign price could now reverse.
And, as we can see…
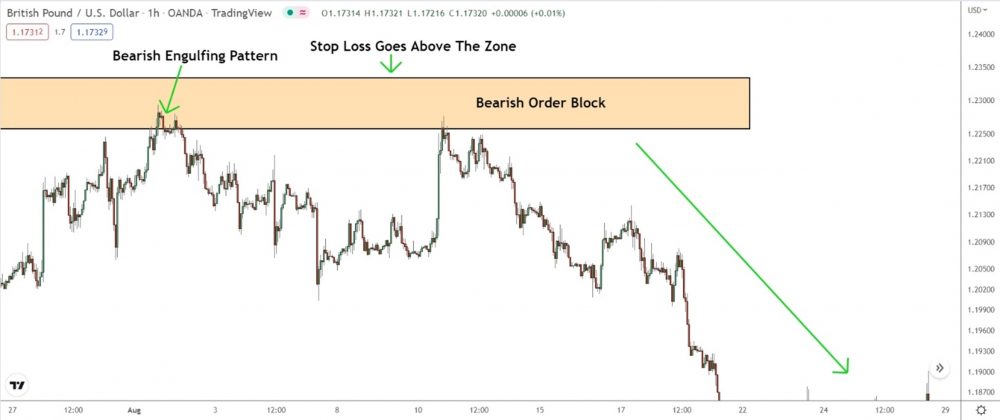
Price reverses, confirming the banks sold to create the bearish engulf.
#3: Other Entry Signals
Pin bars and engulfing patterns – neat entry signals, huh? But wait, there’s one more way we can enter order blocks…
Using limit orders – i.e the set and forget method.
Set and forget, isn’t that a S&D strategy?
You bet it is! Set and forget uses limit orders to enter the order block ahead of time. Rather than wait for a pattern, your order executes automatically.
Sweet, right?
But wait, here’s the problem…
Set and forget guarantees entry into the order block…. but provides NO confirmation price will reverse – a HUGE problem. Order blocks can fail, as you’d expect. Price will sometimes break a zone without showing any signs of reversing.
With set and forget, that means a losing trade.
See for yourself….
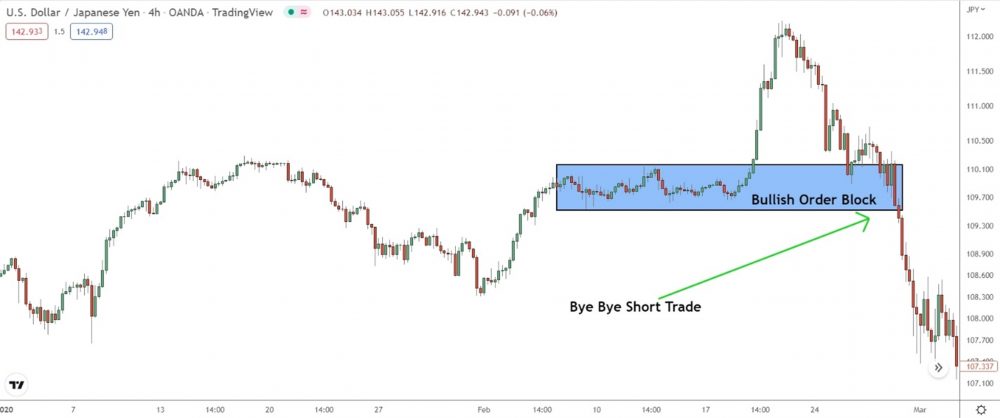
Price SMASHES this order block with barely a hint of stopping – bye bye short trade. Using set and forget meant losing this trade, but with price action, no entry signal appeared.
That’s why confirmation is so important for these trades.
See what I mean now?
My take: Stick to using PA patterns to enter order blocks.
YES, set and forget can offer low-risk, high-reward entries. But compared to price action, the lack of confirmation kills its bottom line. Do yourself a favour… stick to price action. It’s safter, more profitable, and only requires minimal screen time.
A small price to pay for better trades.
Summary
Order blocks – not bad, eh?
Order blocks make an excellent setup for piggybacking the banks into reversal trades. Use them alone or as part of a larger strategy. For me, I like to combine order blocks with supply and demand zones.
- For day-to-day trades, I use supply and demand zones.
- For high probability setups, I use order blocks.
That gives me a nice balance between frequent trades and high probability setups – a winning combo!
Give order blocks a whirl; see if they integrate with your own strategy.
Excellent Article indicating the Order Block Zones, Drawing OB Zones & Specific Candles from the Price Action to look for the Trade Entry in very simple terms.
Thank you very much 😊
Hello bro,
Thank you for your insights. However, I failed to understand the difference between the Order Block and the Demand/Supply Zone. Could you please help explain a little bit more? I appreciate your time.