
Today, I want to shed some light on why trading rally-base-rally/drop-base-drop supply and demand zones might not be the best idea…
Now, I can hear you thinking, “But those zones work well!”
Here’s the thing: they can work… occasionally.
Sure, you might score a successful trade every now and then, but let’s get real; they don’t deliver as consistently as most people believe.
Why is this so?
Well, that’s what I’m about to explain today.
Additionally, I’ll provide a quick rundown on what exactly these rally-base-rally/drop-base-drop and rally-base-drop/drop-base-rally zones are.
So, without further ado… Let’s dive in!
What Are Rally-Base-Rally/Drop-Base-Drop Zones?
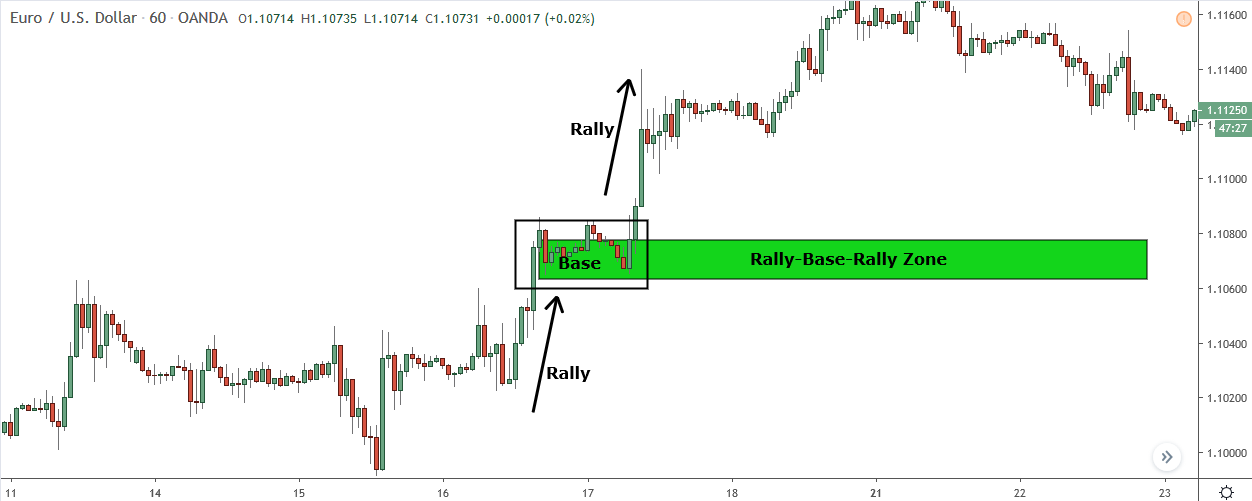
Ever seen a supply or demand zone form in the middle of a swing/trend, as opposed to at the start? If so, you’ve just encountered a rally-base-rally or drop-base-drop zone.
Rally-base-rally and drop-base-drop zones (let’s call them RBR and DBD) are lesser-known…and arguably less common…types of supply and demand zones.
How do they get their names?
From how they form, of course!
RBR and DBD zones form following a movement in one direction, then a base occurs (think of it as a mini consolidation), and then comes another movement in the same direction.
Unlike the rally-base-drop or drop-base-rally zones, which often result in a reversal, RBR and DBR zones, typically lead to a continuation of the preceding movement.
In terms of appearance, RBR and DBR zones mirror rally-base-drop and drop-base-rally zones.
However, here’s the key difference: while rally-base-drop and drop-base-rally zones always create a new swing, RBR and DBR zones ONLY form after a swing has already begun, usually appearing towards the middlle and signalling a continuation.
This may not seem like a big deal, but as we’ll see later, it’s actually one of the main reasons why these zones aren’t always as effective as you might expect.
What Are Rally-Base-Drop/Drop-Base-Rally Zones?
Stepping over to the other side of the fence, we have the more typical supply and demand zones – rally-base-drop/drop-base-rally zones.
If you’re a regular SD trader, these are likely the zones you’re most familiar with.
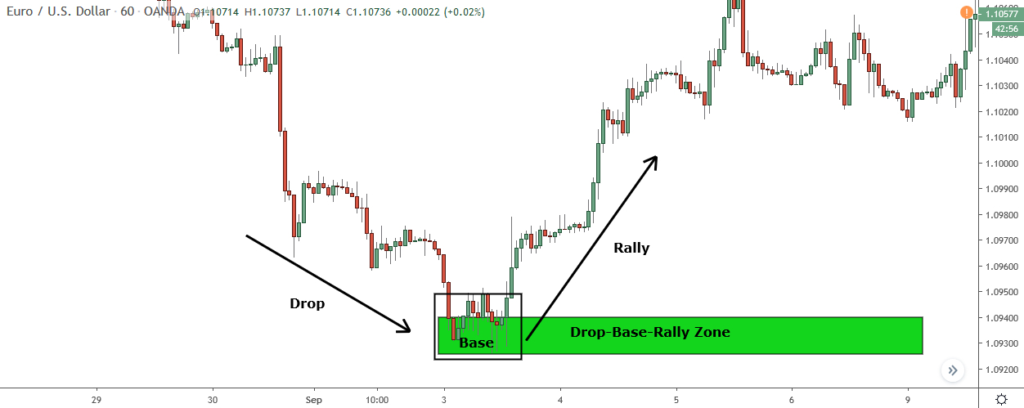
While rally-base-drop/drop-base-rally zones look similar RBR/DBD zones, their formation is way different… Instead of forming in the midst of a swing, they create the swing itself.
The sequence of these zones is also distinctive.
Here’s how it works:
RBD and DBR zones form from a price movement in one direction, followed by a base (a period of consolidation/pause), and then a countermove in the opposite direction. This sequence creates the zone and forms the new swing.
This formation process is not just different but also crucial.
Why, you ask?
Because it’s one of the main reasons these zones tend to outperform RBR/DBD zones, as you’re about to discover…
The Problem With Rally Base Rally/Drop Base Drop Zones
At first glance, RBR/DBD zones seem similar if not identical to RBD/DBR zones.
Both share similar appearances, are traded in the same manner, and form through the same process: the banks’ placing trades (or taking profits in rare cases).
However, appearances can be misleading…
RBR/DBD zones, despite their resemblance to RBD/DBR zones, have a significantly lower likelihood of triggering reversals.
Why, you may wonder?
Well, it all boils down to their formation…
Rally-base-rally (RBR) and drop-base-drop (DBD) zones take shape when banks decide to execute trades or take profits, similar to how rally-base-drop (RBD) and drop-base-rally (DBR) zones form. As the banks undertake these actions, price shifts away, giving birth to the zone.
Up to this point, it all seems fairly straightforward – supply and demand 101, if you will.
However, there’s a critical point to keep in mind…
The chance of a supply or demand zone to trigger a reversal largely hinges on the size of the banks trades. For instance, if the banks have placed a substantial buy trade, a demand zone stands a high chance of causing a price reversal.
The banks would be disinclined towards a breakthrough, given the potential losses.
In essence, the probability of a zone is rooted in the volume of orders flowing into the market at the time when the banks entered their trades. If the market is swimming with orders, banks can execute larger trades, causing a stronger zone to form and increasing the likelihood of a reversal.
Here’s where things get interesting…
In my supply and demand book, I detail how one can evaluate the strength of a zone by weighing up how bullish/bearish the market appeared before the zone formed.
The idea is simple:
The move preceding the zone provides an insight into the number of market participants buying or selling at that time, and thus, the number of orders the banks had at their disposal to execute trades or take profits, resulting in the formation of the zone.
One of the main takeaways from this: a zone created after a long move in the opposing direction is much stronger than a zone created following a move in the same direction.
For example:
If price has been trending lower for a long time and the market appears heavily bearish, any demand zone that now forms due to a rise must be a powerful zone. Because the only way price can rise during a strong downtrend or heavily bearish market if the banks buy up all the sellers.
During a heavy bear market, that takes A LOT of money!
Hence, the demand must be a strong zone.
This also explains why zones that form after a new trend or swing has started (RBR & DBD zones), have a far lower chance of being successful.
If price has already been rising for a while and a demand zone forms, most traders are already buying, so the banks have a much smaller pool of sell orders to use to place buy trades.
Where do rally base rally/drop base drop zones typically form?
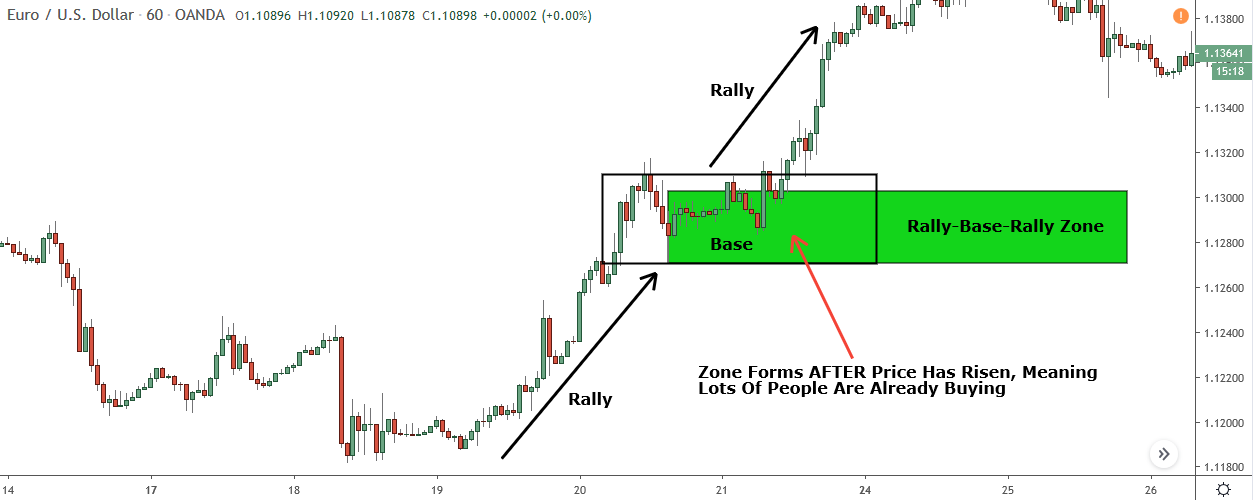
After a new trend or new price swing has already started!
DBD and RBR zones always form in the middle of a swing/trend, when most traders have already started trading in the direction of the new trend.
What does this mean for banks?
Well, they don’t have many orders to execute their trades.
Remember: banks need opposing orders to enter their positions. If banks want to sell, they need people buying; if they wish to buy, they need people selling. The more opposing orders/traders available, the more the banks can buy or sell themselves.
But what if only a few opposing traders are available, like with RBR/DBD zones?
Simple – the banks can’t execute any substantial trades, creating a weak zone.
See my point now?
This situation doesn’t apply to rally-base-drop/drop-base-rally zones.
Unlike their counterparts, these zones always signal the start of a new trend or swing, which means the banks have an abundance of orders to execute large trades with.
The Bottom Line
If you’re a trader who’s all about rally-base-rally/drop-base-drop zones… this post might ruffle some feathers. And that’s perfectly okay.
If you’re trading these zones and scoring big, more power to you!
Here’s the thing though: pay attention to the zones where your losses are popping up.
Not all, but a significant chunk of my losses always stemmed from RBR/DBD zones. Sure, every now and then, I’d strike gold with a zone.
But for the most part, they didn’t deliver as promised.
So here’s my advice: Keep a keen eye on your wins and losses.
If, like in my case, most of your losses are due to RBR/DBD zones, it might be time to change tactics. But if they’re not, keep at it!
Happy trading!
hello my friend
i bought your books and they are VERY GOOD
but i have a problem
i am new to supply and demand and do not understand how to identify them
ill be glad to see a post or video that discribes how to find them and trade them
You may Share the books bro. I cant afford them but I’m really passionate to learn more and more
I would like to know if you have any tips for distinguishing RBR/RBD. During live when I am at the “BASE” part, I cannot tell if it will become a rally or drop in the near future, but once I see a candles start to move out of the zone and see an engulfing pattern, I would place an order, only to see that the candles goes against me after a few more candlestick resulting in loosing trades. Thank you in advance.